 Save
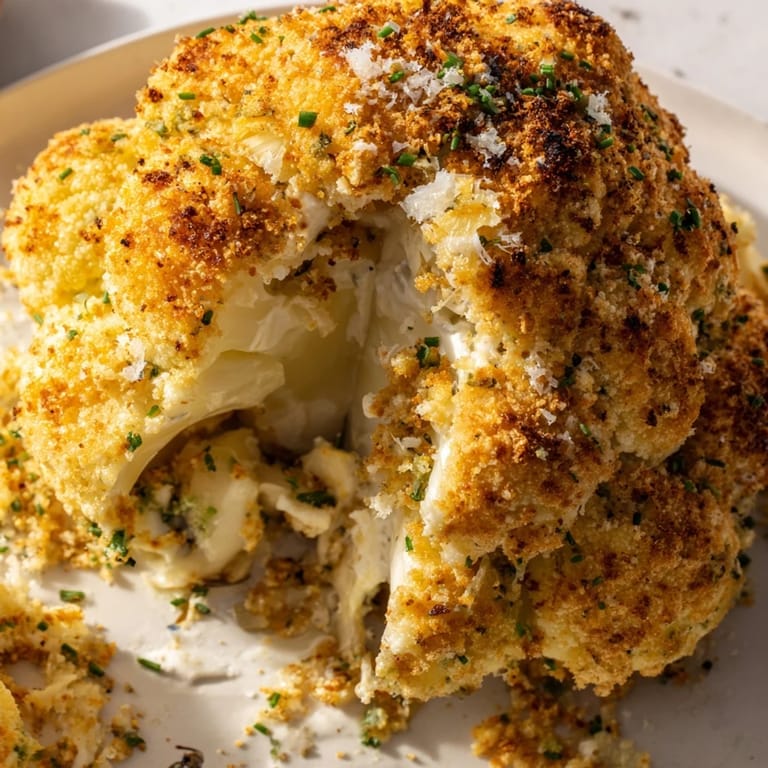
Save The first time I saw a whole roasted cauliflower on a restaurant menu, I was skeptical. How could something so simple be worth ordering? Then it arrived at our table, golden and steaming, and that first bite of creamy, cheesy center completely changed my mind. I've been making it at home ever since, and it never fails to impress everyone who tries it.
I made this for a dinner party last fall when my friend announced she was going vegetarian. Everyone was so focused on the beautiful golden cauliflower that nobody noticed there was no meat on the table until we were halfway through the meal. That's when you know a dish is truly something special.
Ingredients
- 1 large whole cauliflower: The foundation of this dish, so choose one that feels heavy and firm with tight, creamy florets
- 1 tbsp olive oil: Helps the exterior develop that gorgeous golden roasted color
- ½ tsp salt and ¼ tsp black pepper: Simple seasoning that enhances the cauliflower's natural sweetness
- 150 g cream cheese, softened: Creates the velvety base for our filling that melts into every crevice
- 100 g shredded mozzarella cheese: Adds that incredible stretch and mild, milky flavor we all love
- 50 g grated Parmesan cheese: Brings a salty, umami depth that balances the creaminess
- 2 tbsp chopped fresh chives: Adds a mild onion brightness that cuts through all that richness
- 1 garlic clove, minced: Because garlic makes everything better, especially when it roasts into the filling
- ½ tsp smoked paprika: My secret ingredient for a subtle smoky depth that feels sophisticated
- ¼ tsp ground nutmeg: Just enough to add warmth without making it taste like dessert
- 1 tbsp milk: Helps thin the filling slightly so it's easier to stuff into tight spaces
- 50 g shredded cheddar cheese: Creates that beautiful orange topping that gets perfectly crispy
- 2 tbsp breadcrumbs: The crunch factor on top that contrasts beautifully with the tender cauliflower
- 1 tbsp melted butter: Binds the topping together and helps it turn golden brown
Tired of Takeout? 🥡
Get 10 meals you can make faster than delivery arrives. Seriously.
One email. No spam. Unsubscribe anytime.
Instructions
- Get your oven ready:
- Preheat to 200°C (400°F) and line a baking tray with parchment paper so cleanup is effortless later.
- Prep the cauliflower:
- Trim off the outer leaves and cut just enough from the base to make it sit flat, keeping all those beautiful florets intact.
- Blanch the cauliflower:
- Boil a large pot of salted water and submerge the whole head for 8 to 10 minutes until it's just barely tender. Drain it well and let it cool until you can handle it comfortably.
- Make the cheese filling:
- Combine the cream cheese, mozzarella, Parmesan, chives, garlic, smoked paprika, nutmeg, and milk until you have a smooth, spreadable mixture.
- Create stuffing pockets:
- Using a small knife, make deep cuts into the base and between florets to create little hiding spots for all that cheesy goodness.
- Stuff generously:
- Press the cheese mixture into every crevice and the center cavity, using a spoon or your fingers to really work it in there.
- Season the exterior:
- Brush the entire outside with olive oil and sprinkle with salt and pepper so the roasted flavor develops properly.
- Add the crispy topping:
- Mix the cheddar cheese with breadcrumbs and melted butter, then sprinkle it evenly over the cauliflower.
- Roast to perfection:
- Bake for 40 to 45 minutes until the whole thing is golden brown, bubbling, and a knife slides easily through the thickest part.
- Rest and serve:
- Let it sit for 5 minutes before slicing into wedges, which helps everything set and makes serving much easier.
 Save
Save My mother-in-law still talks about the night I served this, mostly because she couldn't believe it was just cauliflower. She's asked for the recipe three times since then, which is probably the highest compliment she could possibly give.
Making It Your Own
I've discovered that sun-dried tomatoes or sautéed mushrooms folded into the cheese filling add incredible depth. Sometimes I'll swap the chives for fresh parsley or dill depending on what's growing in my garden or languishing in the crisper drawer.
What To Serve Alongside
Despite how rich and satisfying this cauliflower is, I always serve it with something fresh and bright. A simple green salad with a sharp vinaigrette or some roasted seasonal vegetables creates the perfect balance on the plate.
Success Secrets
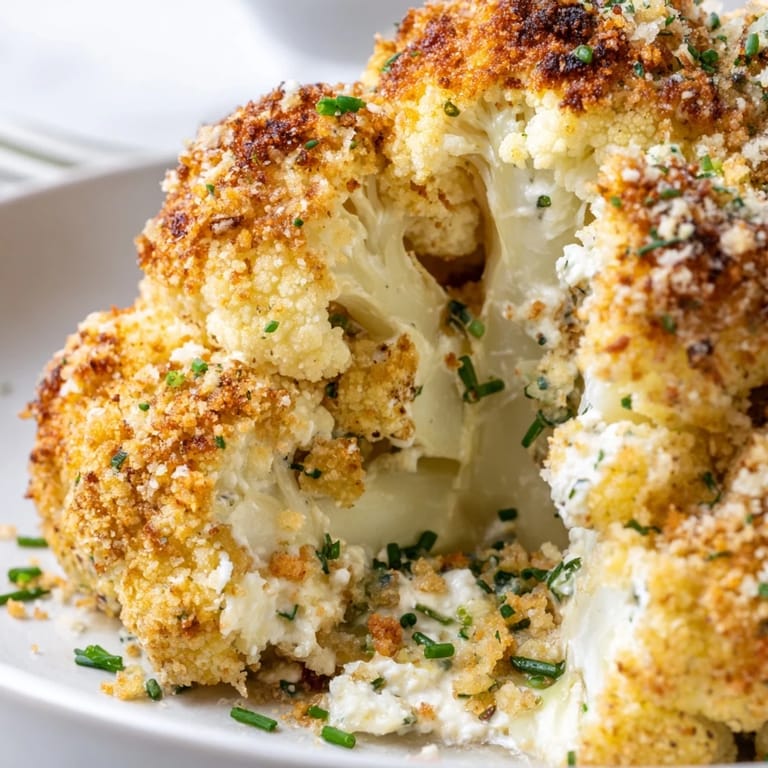
The difference between good and great comes down to how thoroughly you stuff the filling into all those little nooks and crannies. Take your time here and really press the cheese mixture deep into the cauliflower instead of just coating the surface.
- Don't worry if some filling oozes out during baking, that just creates extra crispy edges everyone will fight over
- If the top is browning too quickly, tent it loosely with foil for the last 10 minutes
- Leftovers reheat surprisingly well in a 180°C oven for about 15 minutes
 Save
Save There's something deeply satisfying about serving a whole vegetable that feels like a celebration. Hope this becomes a regular in your rotation too.
Cooking Questions
- → Can I prepare this ahead of time?
Yes, you can boil and stuff the cauliflower up to a day in advance. Store it covered in the refrigerator, then add the breadcrumb topping just before baking.
- → What cheeses work best for the filling?
The combination of cream cheese for creaminess, mozzarella for melt, and Parmesan for depth creates ideal texture and flavor. You can substitute Swiss or Gruyère for a more sophisticated taste.
- → How do I know when it's done?
The cauliflower is ready when the top is deep golden brown, the cheese is bubbling around the edges, and a knife inserts easily into the thickest part of the stem.
- → Can I make this vegan?
Substitute dairy cream cheese and shredded cheeses with plant-based alternatives. Use nutritional yeast in place of Parmesan for umami flavor, and opt for vegan butter.
- → What should I serve alongside?
A crisp green salad with vinaigrette cuts through the richness. Roasted root vegetables, quinoa pilaf, or crusty bread also complement this dish beautifully.
- → Why boil before baking?
Par-boiling ensures the cauliflower cooks through evenly during roasting. Without this step, the exterior would burn before the center becomes tender.