 Save
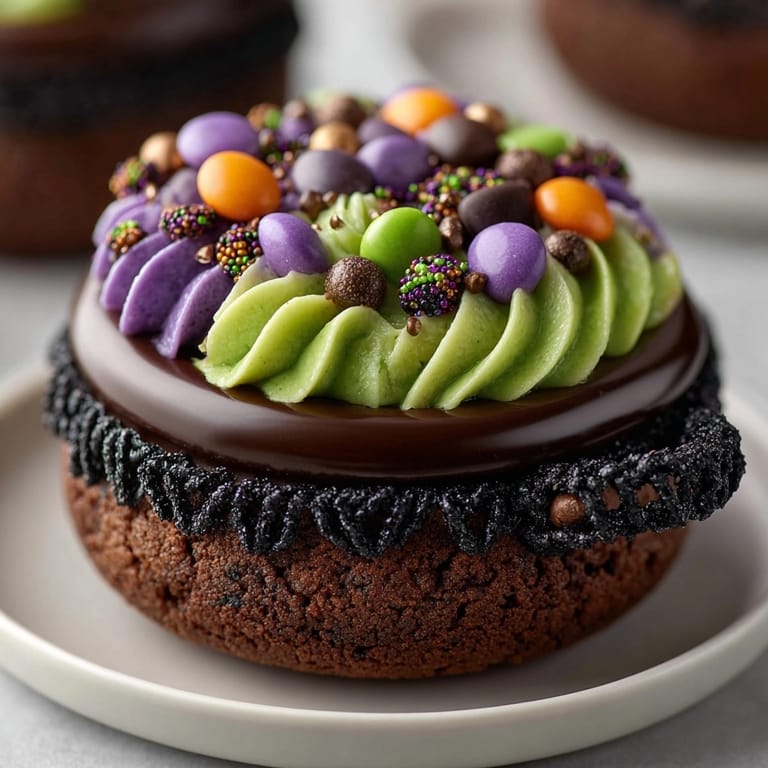
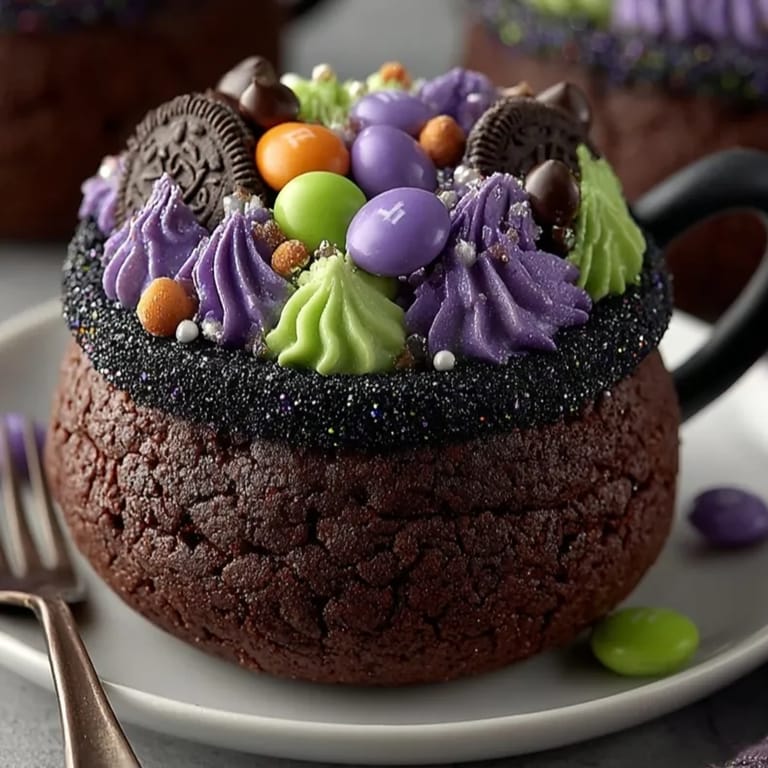
Save Edible Witch Cauldrons are my go-to for magical parties and especially Halloween. These enchanting cookie cups mimic bubbling cauldrons and never fail to delight both kids and grownups. Shimmery candy "potions" layered inside make each cup look spectacular and taste even better.
When I first made these for our neighborhood Halloween bash they were gone in minutes. My youngest loves choosing her own candy combinations for the "potions" and I always enjoy seeing how creative everyone gets.
Ingredients
- Unsalted butter: use high quality for rich flavor it is essential for tender cookie texture
- Granulated sugar: ensures crisp edges and balanced sweetness
- Large egg: binds the dough and adds richness look for fresh farm eggs when possible
- Vanilla extract: gives warmth and depth pure extract yields the best aroma
- All-purpose flour: forms the structural base sift for light cups
- Unsweetened cocoa powder: delivers deep chocolate character use Dutch process if you want extra richness
- Baking powder: helps the cups puff and hold shape check freshness for best lift
- Salt: balances flavors and intensifies chocolate use fine sea salt for even mixing
- Dark chocolate chips or melting chocolate: lines the cup and keeps fillings fresh try a semi-sweet variety for best contrast
- Green or purple colored frosting: makes the "potion" pick thick frosting for neat piping
- Assorted candy bubbles: mini M&Ms or candy pearls give that witches brew effect
- Black licorice laces: create whimsical handles opt for fresh soft laces for easy shaping
- Edible glitter or shimmer powder: sprinkle for extra magic choose food-safe brands
Tired of Takeout? 🥡
Get 10 meals you can make faster than delivery arrives. Seriously.
One email. No spam. Unsubscribe anytime.
Instructions
- Prep and Preheat:
- Preheat your oven to 350 degrees Fahrenheit which sets the stage for golden cookie cups. Lightly grease a 12-cup muffin pan or place liners to prevent sticking
- Cream Butter and Sugar:
- Use an electric mixer or a strong whisk to beat softened butter with sugar until pale and fluffy. This aeration will produce a tender cookie texture. It takes about three minutes at medium speed
- Incorporate Egg and Vanilla:
- Break a fresh egg into the bowl and pour in vanilla extract. Mix until fully blended so your dough does not separate
- Combine Dry Ingredients:
- In a separate bowl stir together all-purpose flour unsweetened cocoa powder baking powder and salt. Whisk very well so the cocoa is evenly distributed and there are no lumps. This ensures a smooth chocolate flavor
- Make the Dough:
- Gradually add dry ingredients into the wet mixture using a mixer on low or a sturdy spatula. Fold gently and stop mixing as soon as the dough comes together. Overmixing can result in tough cups
- Shape the Cauldrons:
- Divide dough into twelve equal portions. Roll each into a ball then place one in each muffin cup. Press the dough firmly into the bottom and up the sides about halfway. Create a pronounced well the deeper the better for filling later
- Bake the Cookie Cups:
- Bake for about fifteen minutes or until the cookie bases are just set and edges begin to firm. If the centers puff too high gently press down with the back of a spoon straight from the oven. Let them cool completely within the pan for easy removal
- Coat with Chocolate:
- Melt chocolate chips in a microwave in thirty second bursts or use a double boiler. Taking a small spoon or pastry brush spread a generous layer of melted chocolate inside each cooled cookie cup. Rotate or tilt the cup to ensure thorough coverage. Set aside till chocolate has hardened
- Fill and Decorate:
- Pipe a swirl of colored frosting into the bottom of each cauldron using a piping bag or zip-top bag with a snipped corner. Add assorted candies to fill the cup simulating bubbling potion. For extra allure dust with edible glitter
- Add Licorice Handles:
- Bend a piece of black licorice into a gentle curve and press each end into opposite sides of the cookie cup forming a handle. If using make sure each handle is anchored deep enough to stay put
- Serve and Savor:
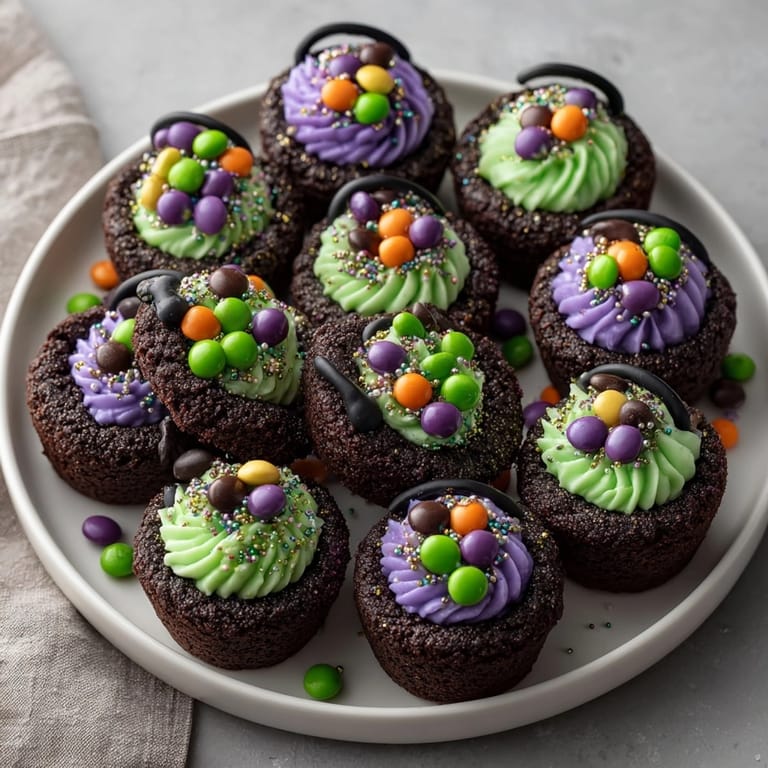
- Arrange on a platter and marvel at your handiwork. Serve as dessert or for trick-or-treating fun
 Save
Save These cauldrons are a powerhouse of whimsy and flavor. My favorite part is the chocolate lining—it keeps the filling fresh and offers a bold snap when you bite in. Last Halloween my mom joined us to make a batch and we ended up with purple glitter everywhere. Decorating these cookies together has become a much-loved tradition.
Storage Tips
Keep witch cauldrons in a sealed container at room temperature and they stay fresh for up to three days. If you want to make ahead bake the cookie cups and store unfilled. Add frosting and candies just before serving for maximum crunch.
Ingredient Substitutions
Try gluten-free flour blends for allergy-friendly treats. Diary-free margarine works in place of butter though it may slightly change the taste. Candy toppings can be swapped to match any festive color scheme or dietary restriction.
Serving Suggestions
Arrange cups on a Halloween-themed tray and sprinkle with extra glitter for drama. For parties set up a "potion station" where guests pipe their own frosting and choose their own candy bubbles. These work great as gifts wrapped individually in cellophane.
Cultural and Historical Context
Cookie cups are an American twist on classic chocolate tartlets but here they gain magical life as witch cauldrons—a perfect fit for Halloween's folklore. The ritual of mixing and decorating them together evokes the spirit of fun and communal celebration.
Seasonal Adaptations
Adapt colors of frosting and candies for any occasion green and red for Christmas pastel hues for spring or summer blues and pinks for birthday parties. Make mini cauldrons using smaller muffin pans for bite-size treats. Switch up candy choices with each season jellybeans for Easter or peppermint nuggets for the winter holidays.
Success Stories
Last year these were the star at our Halloween party every guest loved customizing their cauldron and the kids kept coming back for seconds. My nieces always ask for these at their birthday and love inventing their own spellbinding potions.
Freezer Meal Conversion
To freeze make and bake the cookie cups but skip filling and decorations. Wrap cooled cups well and freeze for up to two months. Thaw and decorate fresh the day you plan to serve.
 Save
Save Try these edible witch cauldrons at your next gathering for a spellbinding treat. The fun is as much in the decorating as in the eating—and every batch is a celebration!
Cooking Questions
- → How do I prevent the cookie cups from losing their shape?
Firmly press the dough into the sides of muffin cups and gently reshape centers after baking if they puff up.
- → Can I use different colors for the frosting and candies?
Absolutely—choose any shades that match your celebration or party theme for a custom effect.
- → Is there an alternative to black licorice handles?
You can skip handles, use colored licorice, or shape edible fondant for a similar look.
- → How should these cauldron treats be stored?
Keep them in an airtight container at room temperature for up to three days for best freshness.
- → Are these suitable for gluten-free diets?
Yes, substitute the all-purpose flour with a gluten-free blend to accommodate dietary needs.
- → What can I use if I don’t have a piping bag?
A zip-top plastic bag with a snipped corner is a convenient substitute for piping frosting.