 Save
Save I'll never forget the Halloween party three years ago when my niece's face lit up seeing a cream cheese skull staring back at her from the appetizer table. It wasn't fancy or complicated, but something about transforming a simple spread and vegetables into a playful skull with crossbones made everyone gather around. That moment taught me that the best party foods aren't always about difficulty—they're about the smile they bring. Now whenever October rolls around, this is the first recipe I reach for.
I still laugh remembering when my friend's teenager came home from school, saw this skull on the counter, and immediately started deconstructing it like they were solving a puzzle. By the time I'd finished setting up the rest of the appetizers, half the skull was already gone, replaced with happy faces around the kitchen island.
Ingredients
- Cream cheese, softened (225g): This is your canvas. Softening it first makes mixing effortless and ensures a smooth, spreadable base. I learned to take it out 15 minutes before I start; it makes a real difference in texture.
- Sour cream (2 tbsp): Your secret weapon for keeping the spread creamy and preventing it from drying out. It also adds a subtle tang that makes people ask what the mystery ingredient is.
- Garlic powder (1 tsp): This brings the savory depth that transforms plain cream cheese into something people actually crave. Don't skip it or use fresh garlic—the powder distributes evenly and won't leave chunks.
- Lemon juice (1 tsp): A small splash that brightens everything without making it taste lemony. It's the ingredient that makes guests say "this is so much better than regular cream cheese."
- Salt and pepper, to taste: Season confidently here. This spread needs more seasoning than you'd think because it's mild before the vegetables join the party.
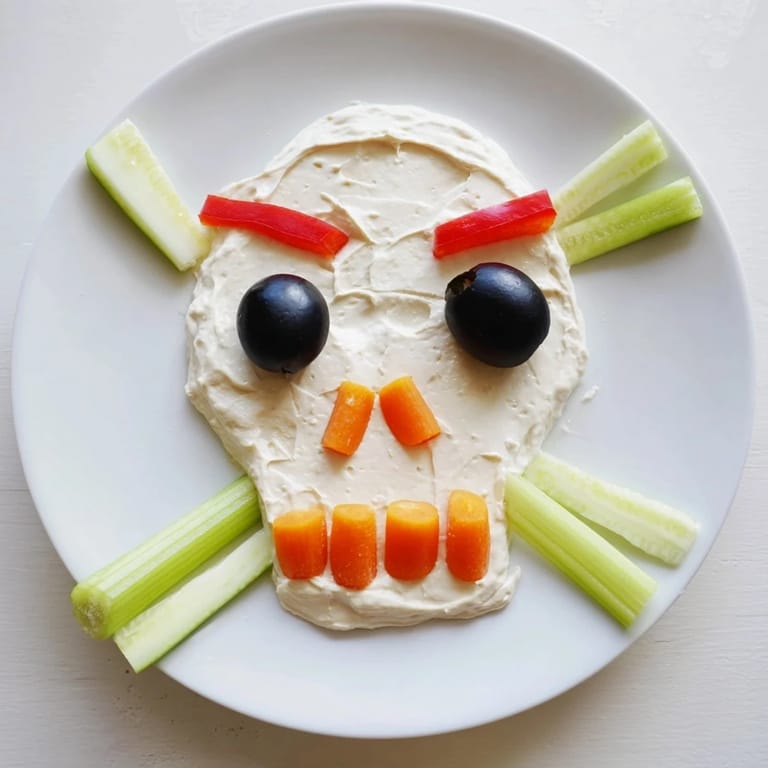
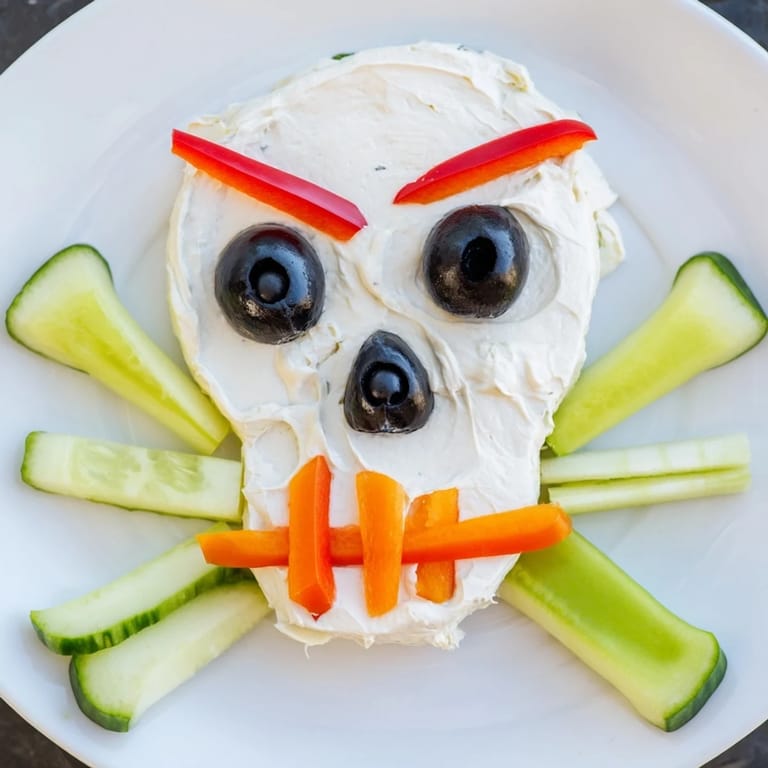
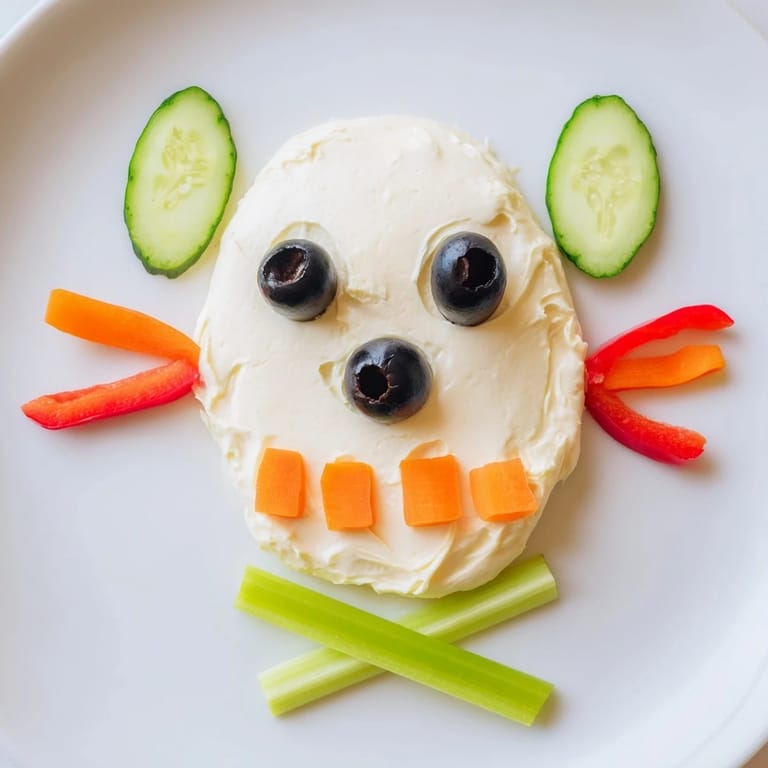
- Cucumber, sliced into rounds (1 small): These become the skull's cheekbones and jawline. Their coolness and mild flavor keep the whole creation from feeling heavy.
- Red bell pepper, cut into strips: These form the mouth and teeth with their bright color and satisfying crunch. I always choose the firmest pepper I can find so the strips stay crisp.
- Black olives, large and halved (2): Your skull's haunting eyes. I prefer pitted olives because standing there pitting olives right before a party is not how I want to spend my time.
- Carrot, sliced and cut for details: These rounds and pieces become teeth and add nose features. Raw carrot stays firm and adds textural interest that keeps people reaching for more.
- Celery sticks or breadsticks (2-4 long pieces): The crossbones beneath the skull. Celery holds its shape better and is naturally dramatic looking. If you use breadsticks, choose sturdy ones so they don't snap when you position them.
- Fresh parsley or chives (optional): A light garnish that adds visual pop and a hint of fresh flavor. I've found this is what makes people think you spent hours on this.
Tired of Takeout? 🥡
Get 10 meals you can make faster than delivery arrives. Seriously.
One email. No spam. Unsubscribe anytime.
Instructions
- Create your creamy base:
- In a medium bowl, combine your softened cream cheese, sour cream, garlic powder, lemon juice, salt, and pepper. Mix with a fork or spoon, working slowly to keep it smooth. You're not making whipped cream—just breaking down the cream cheese until there are no lumps and everything is evenly blended. Taste it. If it needs more seasoning, add a pinch at a time because you can always add more but you can't take it back.
- Shape your skull:
- Pour the spread onto your serving platter and use a spatula or the back of a spoon to mold it into an oval skull shape. Don't overthink this—it doesn't need to be perfect. I usually make it about the size of my hand, then smooth out the top surface. This is where you get to play and make it your own.
- Build the bones:
- Take your celery sticks or breadsticks and position them crossing beneath the bottom of the skull shape, creating an X that extends beyond the spread. These are your crossbones, and they should look dramatic and a little menacing. Push them gently into the spread so they stay put.
- Add the eyes and facial features:
- Place those black olive halves where the eyes should be, pressing them slightly into the spread. Now take a small carrot piece or olive slice for the nose—somewhere in the middle-upper area. Arrange your red bell pepper strips below these features to form a mouth, almost like the skull is grinning. This is the moment it transforms from abstract spread to actual skull.
- Fill in with color and crunch:
- Use your remaining vegetables to fill in details—arrange cucumber slices along the sides and bottom for the jaw and cheekbones, tuck carrot pieces to form teeth along the mouth. Step back and look. If something feels off, rearrange it. The vegetables are your paintbrush here.
- Final garnish and chill:
- Scatter your fresh parsley or chives over the whole creation if you're using them—it adds a pop of green that makes the skull look even more impressive. Cover loosely with plastic wrap and refrigerate until your party begins. Just before serving, arrange crackers and vegetable dippers around the platter on the empty space.
 Save
Save What I treasure most about this recipe is watching people's hesitation disappear the moment they taste it. They come expecting some gimmicky Halloween thing, and instead they taste something genuinely delicious. That's when you know you've created something special.
Flavor Building That Works
The genius of this spread is that every single ingredient serves a purpose beyond just existing. The garlic powder brings umami depth that makes people come back for bite after bite. The lemon juice prevents the whole thing from tasting one-note and flat. The sour cream keeps it from feeling heavy. When you taste it before the vegetables join, you should think "wow, I'd eat this on toast." If you don't feel that way, adjust the seasoning because that base is where all the magic lives.
Making It Feel Effortless
The best part about this recipe is that everything can be done ahead. You can make the cream cheese mixture the night before, keep it covered in the fridge, and simply shape it on the platter 30 minutes before guests arrive. The vegetables can be prepped and stored in containers. On party day, you're just assembling, which means you can actually be present and enjoy your own gathering instead of being stuck in the kitchen. That's when recipes truly succeed—when they give you time back.
Variations That Keep It Fresh
Once you master the basic skull, you realize this technique works for other shapes too. I've made witch hats, pumpkins, even a simple ghost version just by changing the vegetable arrangement. The spread recipe stays exactly the same, so you're really just rearranging vegetables to tell a different seasonal story. For a spicy version, I once added a quarter teaspoon of cayenne pepper to the base and served it with jalapeño slices instead of bell pepper, and it became the unexpected favorite.
- Try mixing in finely chopped fresh dill or chives to the base spread for an herbaceous twist that pairs beautifully with crackers.
- If you want it slightly sweeter, a tiny drizzle of honey mixed into the cream cheese creates an intriguing sweet-savory balance that surprises guests.
- For a gluten-free version, celery sticks work perfectly fine as bones—they actually look more dramatic and menacing than breadsticks anyway.
 Save
Save This skull became my favorite party move because it proves that Halloween food doesn't need to be complicated or require special skills. It just needs to make people smile, taste good, and give you a chance to show off without actually stressing. That's the entire recipe right there.