 Save
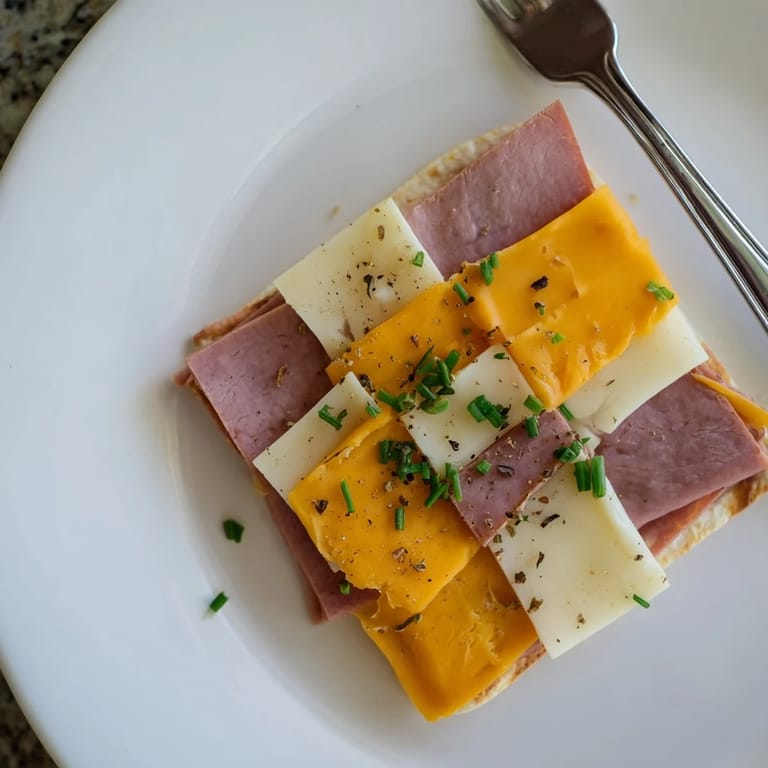
Save I'll never forget the summer afternoon when my cousin pulled out a wooden platter at a family picnic and everyone gasped. There, arranged in perfect alternating squares of deep mahogany turkey, rosy roast beef, creamy Swiss, and golden cheddar, was the most elegant thing I'd ever seen made without a recipe. She called them Checkerboard Picnic Bites, and honestly, they became the dish I'm now known for bringing to every outdoor gathering. The beauty is that they're deceptively simple—no cooking, no stress, just a little precision and patience with a sharp knife.
I made these for my best friend's baby shower last spring, and I watched her face light up when she saw them on the table. Her mom asked for the recipe right away, and within weeks, I was getting texts from people at that shower asking me to bring them to their own events. That's when I realized this wasn't just appetizer—it was a conversation starter and a memory maker.
Ingredients
- Smoked turkey breast, 8 slices: This is your lighter meat base and it has a subtle smokiness that plays beautifully against sharp cheddar. Buy it from the deli counter if you can—it's fresher and you can ask them to slice it thin without the plastic wrapper waste
- Roast beef, 8 slices: The deeper color creates the contrast that makes this whole thing work. Choose a quality roast beef with good flavor; the thinner the slice, the easier it is to cut into neat squares
- Swiss cheese, 8 slices: The holes in Swiss add visual interest and the mild, nutty flavor won't overpower the meats. Some people skip this for provolone, which also works beautifully
- Sharp cheddar cheese, 8 slices: This is where the flavor punch comes from. Don't use the pre-wrapped orange stuff if you can help it—ask the deli for freshly sliced sharp cheddar
- Fresh chives, finely chopped (optional): A small handful gives you a pop of green color and a gentle onion whisper that elevates the whole bite
- Cracked black pepper (optional): This is your seasoning and it looks gorgeous scattered across the top
Tired of Takeout? 🥡
Get 10 meals you can make faster than delivery arrives. Seriously.
One email. No spam. Unsubscribe anytime.
Instructions
- Set up your stage:
- Find a clean, flat surface—a wooden cutting board, a serving platter, or even a piece of parchment paper laid out on your kitchen counter. This is where the magic happens, so make sure you have enough room to work without crowding yourself
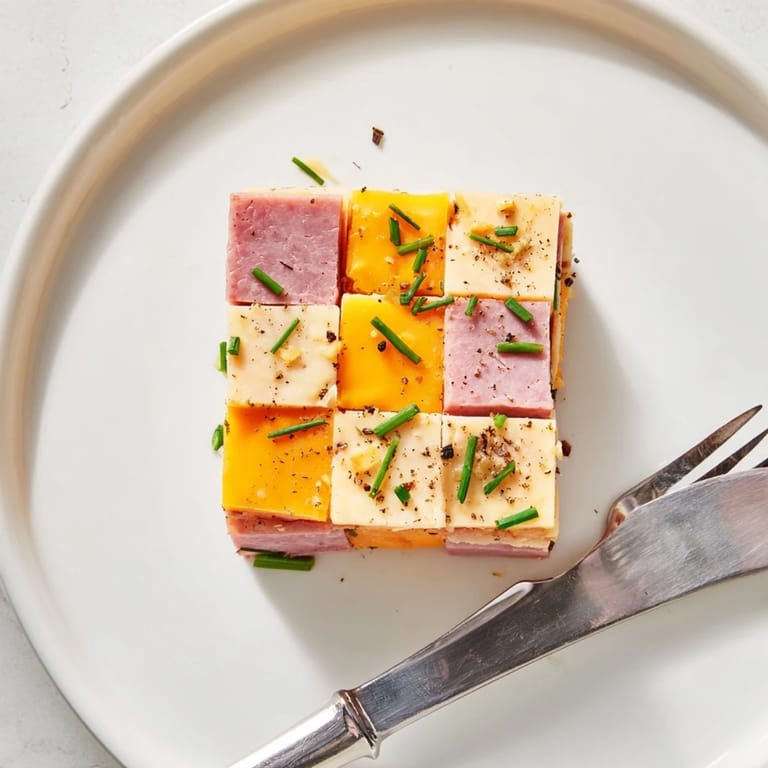
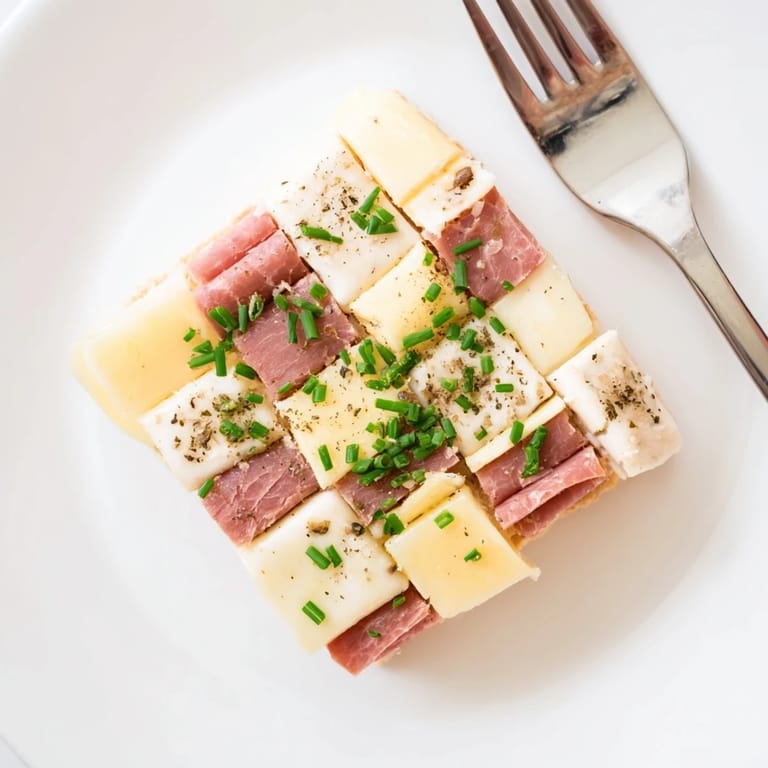
- Cut your ingredients into squares:
- With a sharp knife and steady hands, cut each slice of meat and cheese into 1-inch squares. You want them as uniform as possible so they sit nicely together. I like to stack a few slices at a time and cut them all at once—it's faster and they're more consistent that way
- Plan your checkerboard:
- Before you start placing anything, visualize a 4x4 grid on your board. In my version, I start with turkey in the top left corner, then cheddar next to it, then turkey, then cheddar across the first row. The second row begins with cheddar, then turkey, then cheddar, then turkey. This creates that classic alternating pattern. If you mess it up, don't worry—just rearrange as you go
- Gently press and adhere:
- As you place each square, press it gently to the one beside it. If you're worried about them moving around, especially if you're transporting them somewhere, place the tiniest dab of honey or whole grain mustard under each square. It acts like edible glue and adds a subtle flavor boost. Most people won't even notice it's there, but it makes all the difference for stability
- Add your finishing touches:
- Once your checkerboard is complete and you're happy with how it looks, sprinkle the chopped chives and cracked black pepper over the whole thing. This adds color contrast and makes it look like you really know what you're doing
- Chill and serve:
- Pop it in the fridge if you made it ahead, or serve it straight away at room temperature. Either way, these bites are best enjoyed fresh and within a few hours of assembly
 Save
Save One rainy afternoon, my five-year-old nephew sat at the kitchen counter while I was making these, and he declared them "the most beautiful food ever." He didn't eat more than one bite, but he kept asking to help me arrange the squares. That's when I realized that this recipe is really about slowing down and making food with intention, whether you're doing it alone or with someone you love beside you.
The Art of the Checkerboard
There's something almost meditative about arranging these squares. Once you cut everything, the actual assembly takes maybe five minutes, and I find myself slowing down and really paying attention. The contrast between colors, the slight give of the cheese under my fingertips, the satisfaction of creating a pattern—it all feels a little bit like making edible art. Some people use toothpicks to keep the squares together, and that works too, though I prefer the simplicity of just pressing them together gently.
Variations and Flavor Combinations
Once you understand the checkerboard principle, you can play with it endlessly. I've made versions with prosciutto and fresh mozzarella that felt fancy and Italian. I've done salami and Havarti for something with more funk and complexity. In the summer when my garden is overflowing, I make a vegetarian version with roasted beet slices and crisp cucumber slices, and honestly, nobody even misses the meat. The formula is simple: pick two ingredients with visual and flavor contrast, cut them into squares, and arrange them in an alternating pattern. You've got a show-stopper.
Perfect Pairings and Serving Ideas
I learned that these little bites deserve proper accompaniments. A crisp sparkling wine, ice-cold lemonade, or iced tea all complement the salty, rich flavors beautifully. If you're serving them at a picnic, put a small stack of toothpicks on the platter so people can spear them easily. If you're plating them for a more formal gathering, nestle them on a bed of arugula or microgreens for extra color. And here's a secret—make them earlier in the day and keep them covered in the fridge. They actually taste better when the flavors have had time to meld slightly, and the chill makes them more refreshing.
- Serve within a few hours of assembly for the best texture and freshness
- If you're making these for outdoor events, transport them on a flat platter with parchment between layers to prevent sliding
- Double or triple the recipe for larger gatherings—the math stays simple because it's just four ingredients in a grid
 Save
Save These bites taught me that the most impressive dishes are often the simplest ones. There's no flame, no complicated technique, just intention and a little bit of precision. Make them this week.
Cooking Questions
- → What meats are used in the checkerboard bites?
Smoked turkey breast and roast beef, sliced into 1-inch squares, are the meats featured in these bites.
- → Can the checkerboard bites be served warm?
These bites are best served chilled or at room temperature to maintain their shape and texture.
- → How do I keep the squares together during transport?
Press adjacent pieces gently and optionally use small dabs of honey or mustard under each square to help them adhere.
- → Are there vegetarian alternatives to the meats?
Yes, replace meats with contrasting vegetables like roasted beet and cucumber slices to maintain the checkerboard effect.
- → What garnishes enhance these bites?
Freshly chopped chives and cracked black pepper add color and a touch of flavor as garnishes.
- → What occasions suit these checkerboard bites?
Ideal for picnics, party platters, or casual gatherings, providing a visually appealing and easy-to-eat option.